Quickly Create a CrazyTalk Animator G3 Character From Original Art
 |
See how I turn this free VectorCharacters.net image into a CrazyTalk Animator 3 Character. |
Here's how to rig a CrazyTalk Animator 3, G3 human character, with the fewest components, whilst still being compatible with G3 character motions, and having a face capable of lip syncing and character expressions.
You should be able to do this in under an hour - assuming you have your artwork ready to go.
The process is even quicker if you have the Pipeline edition of CTA3 and take advantage of the supplied Photoshop templates and import feature. If you have the Pro edition you'll have to import your character art sprites in manually to one of the G3, Human, Dummy Templates.

Note that I'm assuming you have some experience using CTA3's character composer. This post isn't intended to be a detailed, step by step tutorial.
Artwork Preparation
The first step is to break your character artwork up into six components; Head, Torso, Left Arm, Left Leg, Right Arm, Right Leg. If you're using one of the CTA3 Photoshop templates, there are two to choose from depending on the orientation of your character, Human_Side_Simple_Template.PSD or Human_Front_Simple_Template.PSD. I used the former for this character.
Each of the body parts need to be on their own layer in your image file and arranged to match the pose of the dummy character. In the template you'll need to put each image layer within its corresponding image folder; RArm, LArm, Head, RThigh, LThigh, Hip (be sure to delete the existing dummy image from the hip folder).
 |
| Left: Character separated into six body parts. Right: Character assembled with bone points positioned. |
For my character I copied the full image to each of the corresponding folders then edited out every part of the image not relevant to that body part. I also had to do some work straightening out the characters arms, removing her backpack and finishing off the top of the legs and arms so they still look attached correctly to the character when they start moving around.
In the template you'll then need to position all the bone markers to their corresponding body points. If you're not using the template and importing your body parts directly into CTA3 you'll position your bone points in the next stage.
| Create New G3 Free Bone Actor Button. |
Importing the Character into CTA3
If you have the Photoshop template, just import this in using the Create New Character button. This will open up the character composer and you'll see your
character all rigged with bones in place. You may like to adjust the wire frame settings on the sprites to a finer setting to get smoother distortions when the arms and legs bend.
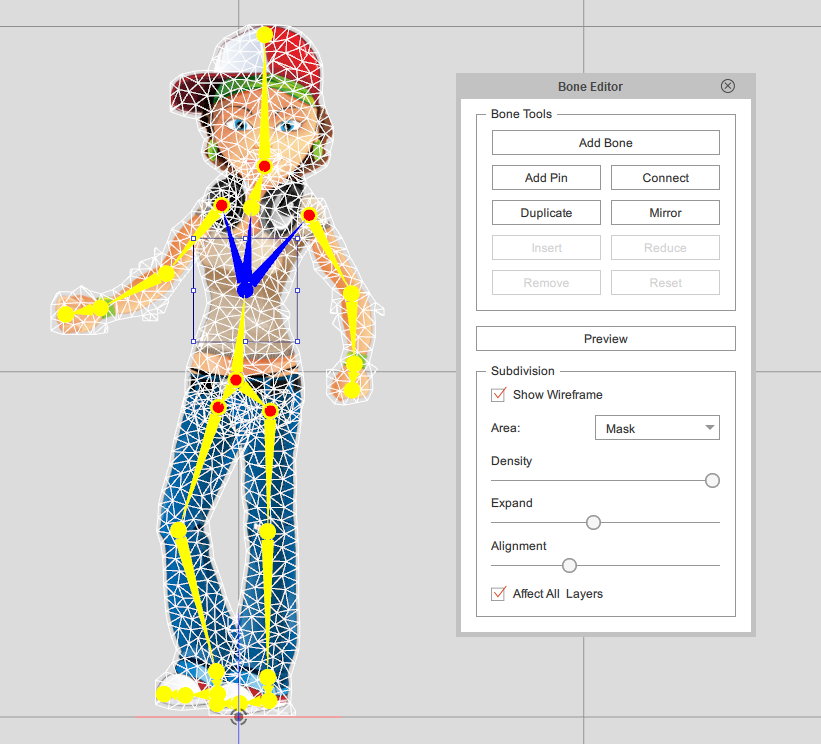 |
| Adjusting the wire frame to a finer setting. Make sure 'Affect All Layers' is ticked. |
Creating an Animated Face
Morph based heads has been a feature of CTA since version 1. Generally it's a feature used to create talking photographs but can also be used to bring your original cartoon artwork to life too. Morph heads include a range of comic style eyes and mouths that can save you a lot of drawing time, even with the greatly enhanced G3 character faces that require fewer images than their G2 counterparts.
To get started just select the head sprite in the Character Composer then select the 'Convert to Morph-based head' option on the Create Head Button (or from the FaceEditor drop down menu).
Then just run through the morph based head creation process. It'll take a little bit of trial and error to get the semi 3D nature of this style of head looking good but generally it does work quite well and will allow your 2D character to turn their head slightly.
 |
| Morph-based Head Fitting Editor. |
Once complete, you'll have an animated head but the eyes and mouth won't particularly look great.
Replacing the Eyes and Mouth
 |
| There are several options for eyes and mouths that work well with cartoon style art. |
Once you have what you like you can then go into the eye and mouth editors respectively and further refine their appearance, such as making the pupils bigger or smaller, adding/removing makeup, adding/removing eyelashes, adjusting the width, height and position of teeth etc.
The Finished Character
Once you've finalised the face your character is done. The body can take full advantage of G3 motions, whilst the face can either be manually keyframed or animated using the face puppeting feature.
This style of character is great for minor characters that require some animation but you don't want to spend hours on, or if you need a character in a hurry for a tight deadline (maybe you're creating fast parody animations about the news of the day).
Unlike full G3 characters you won't have the ability to change hand sprites but you can get around this by creating whatever hand you need as a prop and attaching it in front of the existing hand at the appropriate moment (as one suggestion).
Below is a fairly rough demonstration of the Casual Girl character in action. It's not perfect but you get an idea of the character walking, talking (yes I know the TTS voice is awful), and a bit of facial expression at the end. Good enough for anyone who needs to create reasonably good looking characters quickly.


Comments
Post a Comment